

Mastering how to mold chocolate transforms melted chocolate into stunning three-dimensional creations with professional polish and precision. Understanding how to use a chocolate mold properly requires knowledge of chocolate tempering, mold selection, and finishing techniques that separate amateur attempts from bakery-quality results. This comprehensive guide reveals professional methods for creating perfectly molded chocolates that impress guests and elevate any celebration.
Understanding Chocolate Molds and Materials
Professional chocolate mold selection forms the foundation of successful chocolate crafting. Different mold materials offer distinct advantages depending on your skill level, production volume, and desired finish quality.
Types of Chocolate Molds
How to mold chocolate successfully begins with understanding mold material properties. Polycarbonate molds deliver the glossiest finish and exceptional detail reproduction, making them the professional standard for chocolate mold work. These rigid molds withstand repeated use without warping and release chocolates cleanly when properly prepared. The Chocolate Mold Heart Facet CW1913 exemplifies professional polycarbonate quality, while the Chocolate Mold Tablet Facet CW2448 offers geometric precision.
Silicone molds provide flexibility that simplifies demolding for beginners learning how to use a chocolate mold. The Formaflex Silicone Mold series accommodates various shapes while releasing chocolates with gentle flexing. Magnetic molds combine polycarbonate clarity with precise alignment systems, perfect for hollow chocolates and complex designs like the Chocolate Mould Magnetic Santa Claus HM018.
|
Mold Type |
Best For |
Finish Quality |
Skill Level |
|
Polycarbonate |
Professional production |
Highest gloss |
Intermediate-Advanced |
|
Silicone |
Home baking, flexible shapes |
Good shine |
Beginner-Friendly |
|
Magnetic |
Hollow chocolates, 3D designs |
Excellent detail |
Intermediate |
|
Thermoformed |
Seasonal designs, large pieces |
Very good |
All levels |
Mold Design Considerations
Choosing appropriate designs affects how to mold chocolate successfully. Simple geometric shapes like the Chocolate Mold Half Sphere Facet CW1909 work best for beginners, while intricate designs such as the Chocolate Mold Sakura Origami CW1918 require advanced technique. Deep cavities need careful attention to eliminate air bubbles, whereas shallow molds like the Praline Classic Bonbon Chocolate Mold release easily with minimal tapping.
Seasonal chocolate molds offer themed options for holidays, while chef-inspired molds provide signature designs created by renowned chocolatiers. Consider cavity size, detail complexity, and intended use when selecting chocolate mold designs for your projects.

Essential Equipment and Ingredients
Professional how to mold chocolate results require quality equipment and properly selected chocolate that performs consistently throughout the molding process.
Chocolate Selection for Molding
How to use a chocolate mold effectively depends on chocolate quality and type. Couverture chocolate containing minimum 31% cocoa butter delivers superior snap and glossy finish but requires tempering. The Dark Chocolate 55% Venezuela provides rich flavor and professional performance, while Venezuelan Blend 55% Sticks offer convenient pre-portioned amounts.
Compound chocolate made with vegetable oils eliminates tempering requirements, making it ideal for beginners. FCH Milk Compound Chocolate Drops K200 melt smoothly and set quickly without crystallization concerns. White chocolate requires lower temperatures; FCH White Chocolate Latin American Origin 28% balances workability with flavor.
Required Tools and Accessories
Successful how to mold chocolate techniques require specific tools beyond basic kitchen equipment. A Digital Thermometer with Immersion Probe ensures accurate temperature monitoring during tempering, while Rigid Plastic Scrapers remove excess chocolate cleanly from mold surfaces.
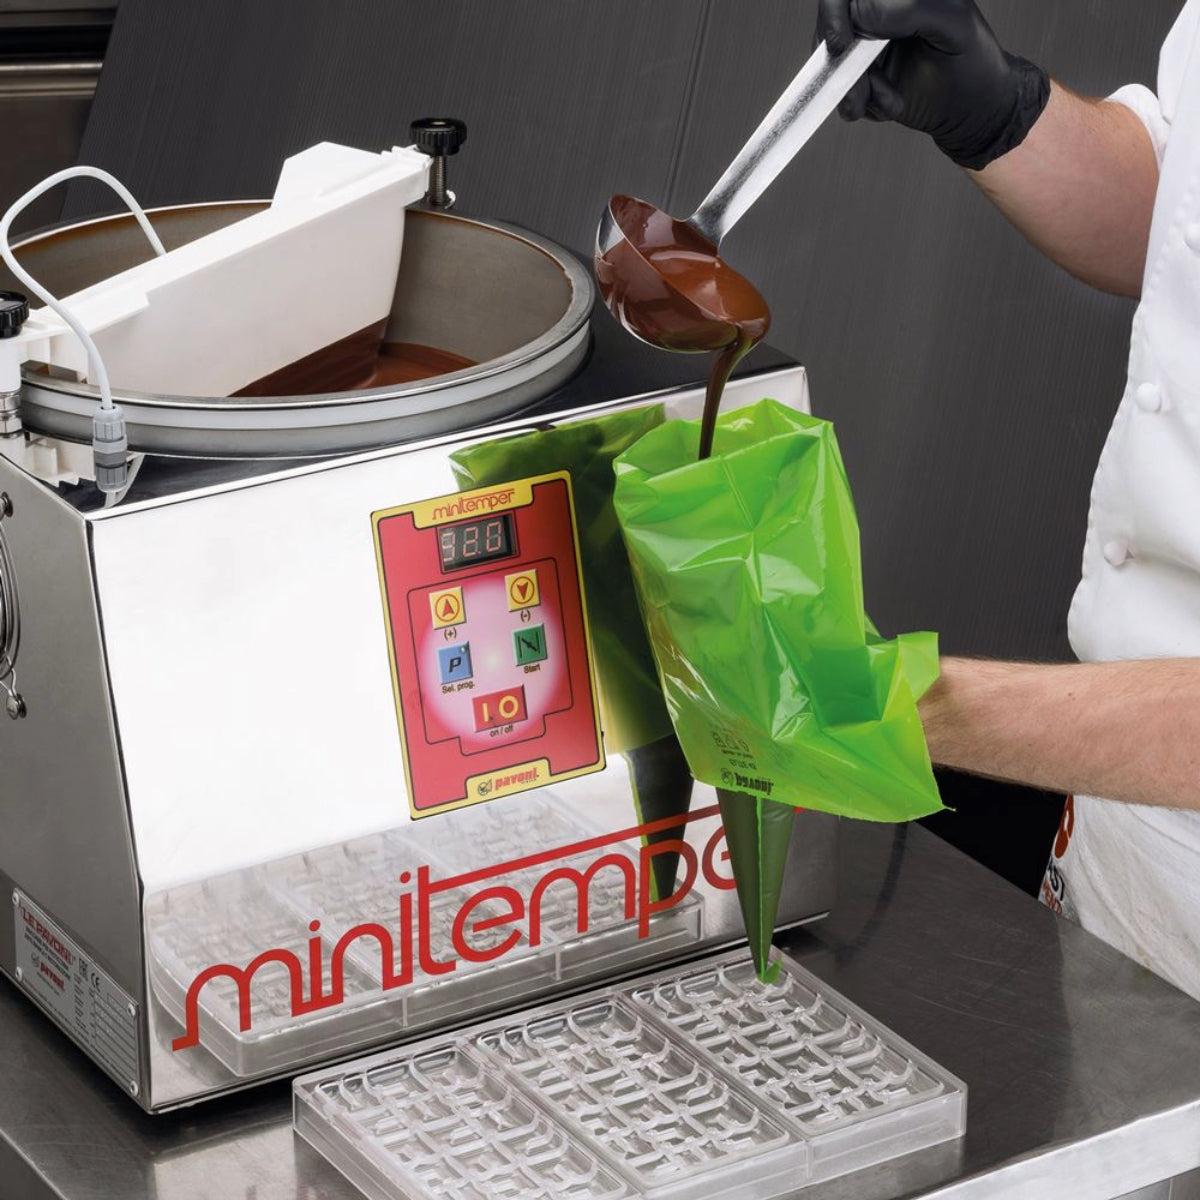
Professional results demand proper chocolate melting equipment. The Chocolate Melter 6kg Capacity maintains consistent temperatures for extended work sessions, while the Pavoni Minitemper 110V automates tempering for foolproof results. Angular Plastic Spatulas help spread chocolate evenly across chocolate mold surfaces.
The Tempering Process Explained
Understanding how to mold chocolate properly requires mastering tempering, the process that stabilizes cocoa butter crystals for glossy finish and satisfying snap.
Why Tempering Matters
Properly tempered chocolate creates stable crystal structure that produces chocolate mold results with professional appearance and texture. Untempered chocolate develops white streaks called bloom, melts quickly at room temperature, and releases poorly from molds. The crystallization process aligns cocoa butter molecules into specific formations that create chocolate's characteristic snap and shine.
Temperature control during tempering determines crystal formation. Dark chocolate requires different temperatures than milk or white varieties due to varying cocoa butter and milk solid content. Precise temperature management ensures proper crystal development throughout how to use a chocolate mold processes.
Step-by-Step Tempering Methods
How to mold chocolate begins with selecting appropriate tempering method. The seeding method adds unmelted chocolate to melted chocolate, introducing stable crystals that propagate throughout the mixture. Follow precise temperature guidelines for each chocolate type:
|
Chocolate Type |
Melting Temp |
Cooling Temp |
Working Temp |
Test Time |
|
Dark Chocolate |
115-120°F (46-49°C) |
82-84°F (28-29°C) |
88-90°F (31-32°C) |
3-5 minutes |
|
Milk Chocolate |
110-115°F (43-46°C) |
82-84°F (28-29°C) |
86-88°F (30-31°C) |
3-5 minutes |
|
White Chocolate |
105-110°F (40-43°C) |
82-84°F (28-29°C) |
82-84°F (28-29°C) |
3-5 minutes |
Melt two-thirds of your chocolate to the appropriate melting temperature, then add remaining chocolate gradually while stirring constantly. Temperature drops to cooling point as stable crystals form. Gently reheat to working temperature and test temper by spreading small amount on parchment; properly tempered chocolate sets within the specified time with slight matte finish.
The tabling method involves pouring melted chocolate onto marble surface and working it with Professional Spatulas until temperature drops and chocolate thickens. This traditional technique requires practice but provides excellent control over crystal formation. For consistent results, automatic tempering machines like the T5 Countertop Tempering Machine eliminate guesswork from chocolate mold preparation.

Basic Molding Techniques
Mastering fundamental how to use a chocolate mold techniques establishes foundation for creating various chocolate types from solid pieces to hollow shells.
Preparing Molds for Use
Clean, polished chocolate mold surfaces ensure flawless finish. Wash molds with warm soapy water and dry completely with lint-free cloth. Any moisture causes chocolate to seize and develop white spots. Polish polycarbonate molds with cotton cloth to remove fingerprints and dust particles that transfer to chocolate surfaces.
Bring molds to room temperature before use; cold molds cause chocolate to contract unevenly and stick. Pre-warm slightly if working in cool environments, but avoid excessive heat that prevents proper crystallization. Inspect molds for scratches or damage that mar finished chocolate mold results.
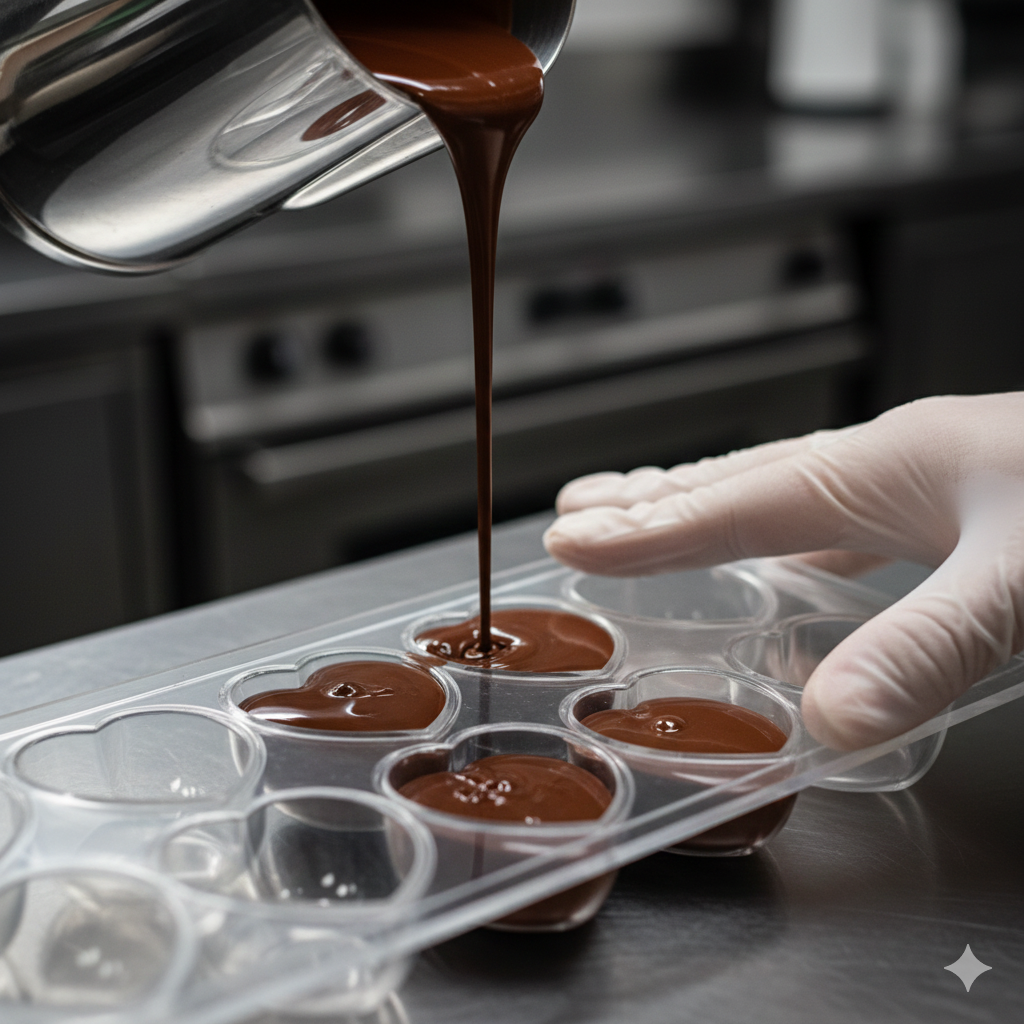
Creating Solid Molded Chocolates
How to mold chocolate for solid pieces requires filling cavities completely and removing trapped air. Pour tempered chocolate into chocolate mold cavities until slightly overfilled. Tap mold firmly on countertop 15-20 times to release air bubbles that create holes in finished surfaces. Use Chocolate Scrapers to remove excess chocolate from mold tops, creating flat backing.
Allow chocolate to crystallize at room temperature for 20-30 minutes or refrigerate for 10-15 minutes if needed. Properly set chocolate contracts slightly from mold walls and develops satin finish. Turn mold over and flex gently; chocolates should release cleanly. The Chocolate Mold Gems CW1632 produces beautiful solid pieces, while larger molds like Chocolate Mold Egg Smooth 70mm CW1251 create impressive hollow or solid eggs.
Making Hollow Chocolate Shells
Hollow chocolates require multiple coating layers in how to use a chocolate mold techniques. Pour tempered chocolate into cavities and rotate mold slowly to coat all interior surfaces evenly. Pour excess chocolate back into bowl, then scrape mold edges clean. Invert mold over parchment paper allowing excess chocolate to drain for 2-3 minutes.
Place coated chocolate mold right-side up and allow first layer to crystallize until matte but still tacky, approximately 5-8 minutes. Apply second coating using same method, building shell thickness to desired strength. Multiple thin coats create stronger shells than single thick layer. The Chocolate Mould Magnetic Penguin HM013 works perfectly for hollow designs requiring precise alignment.
Advanced Decoration and Finishing
Elevating how to mold chocolate from basic to extraordinary involves strategic decoration techniques that add visual impact and personalization.
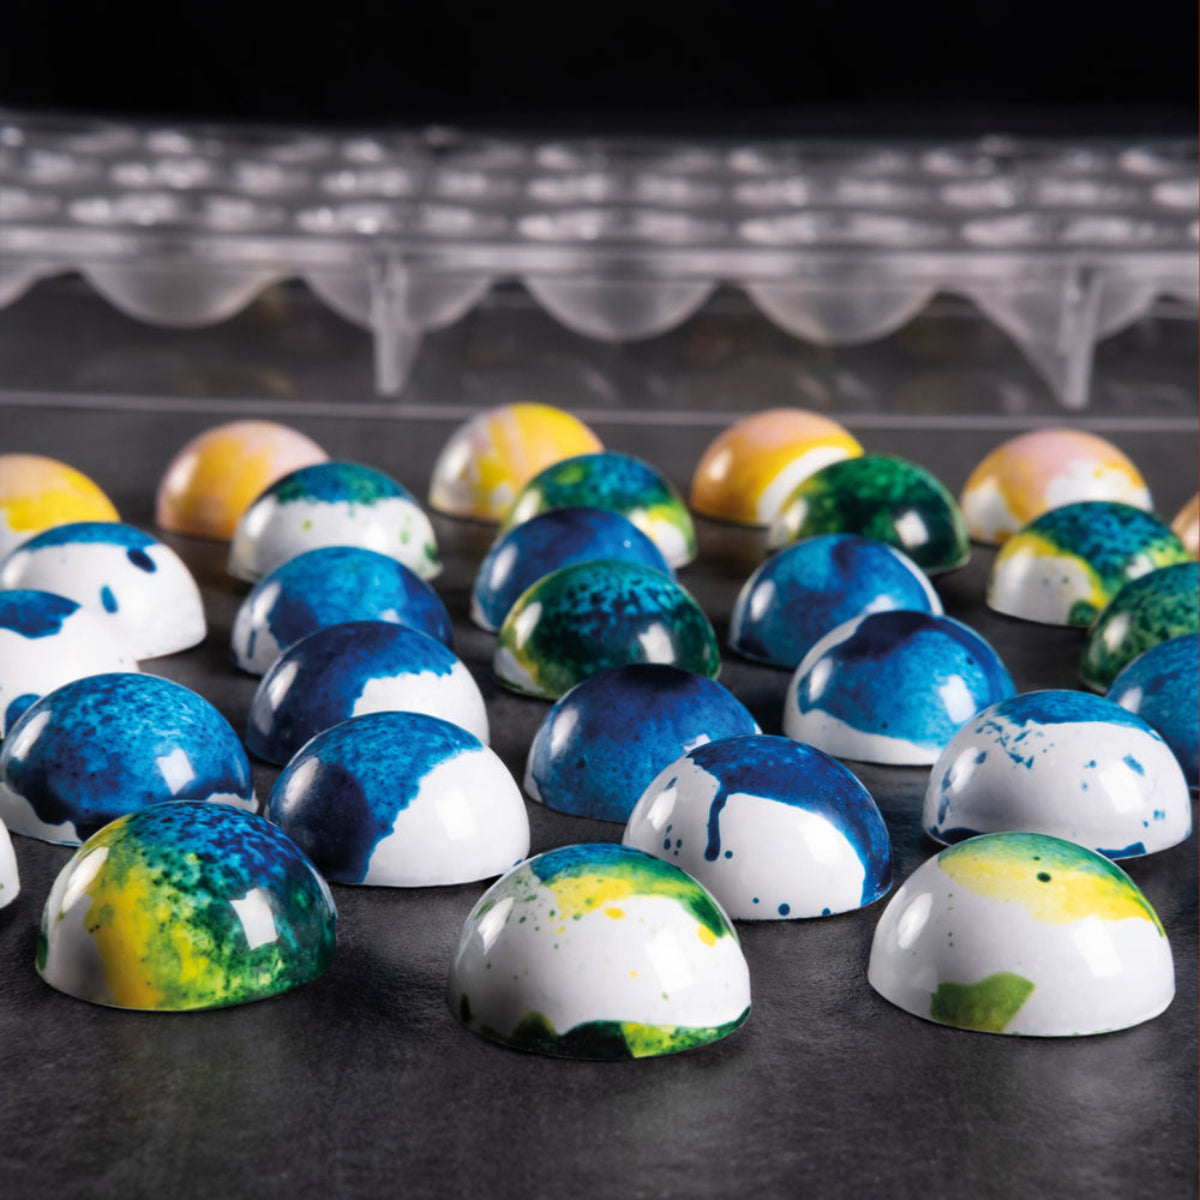
Using Colored Cocoa Butter
Painted chocolate mold designs transform plain chocolates into artistic creations. The Pavoni Italia professional color range offers cocoa butter colors in extensive palette from Black Cocoa Butter to Tiffany Blue Fat-Soluble Powder. Warm cocoa butter colors to liquid consistency and paint designs directly into clean molds before adding chocolate.
For uniform coverage, KREA Swiss spray equipment delivers professional results. The HOTCHOC heated airless spray gun maintains optimal cocoa butter temperature throughout application, preventing crystallization and creating gradient effects impossible with brushes. Apply light coats, allowing each to crystallize before adding subsequent layers for depth and dimension in chocolate mold decoration.
Transfer Sheet Applications
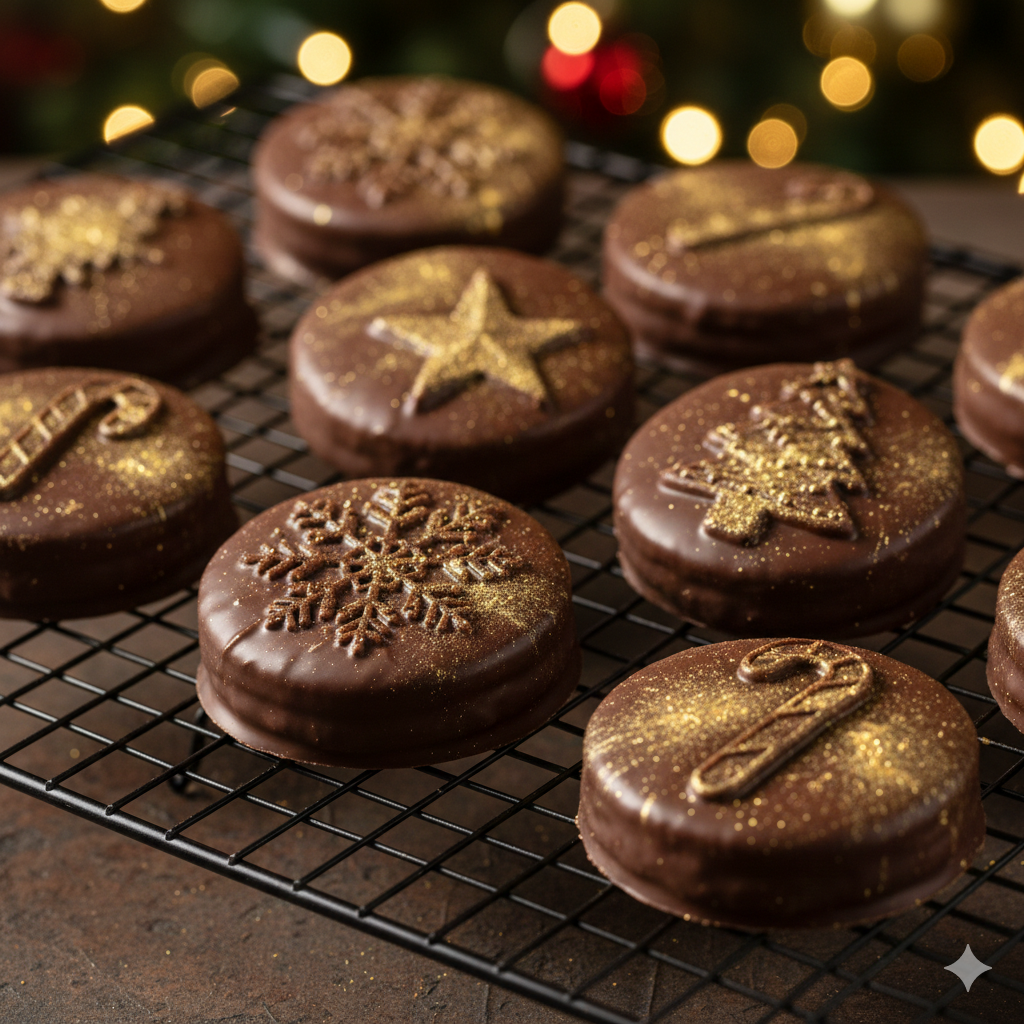
Transfer sheets provide instant professional decoration for how to mold chocolate projects. Transfer Sheets in various patterns adhere to tempered chocolate surfaces, releasing intricate designs as chocolate sets. Cut transfer sheets to fit chocolate mold dimensions and place printed side against chocolate immediately after pouring.
Seasonal designs like Transfer Sheets Christmas Subjects or Transfer Sheets Love Hearts add festive touches effortlessly. The pattern transfers to chocolate backing during crystallization, creating detailed decoration without hand-painting skills required for how to use a chocolate mold effectively.
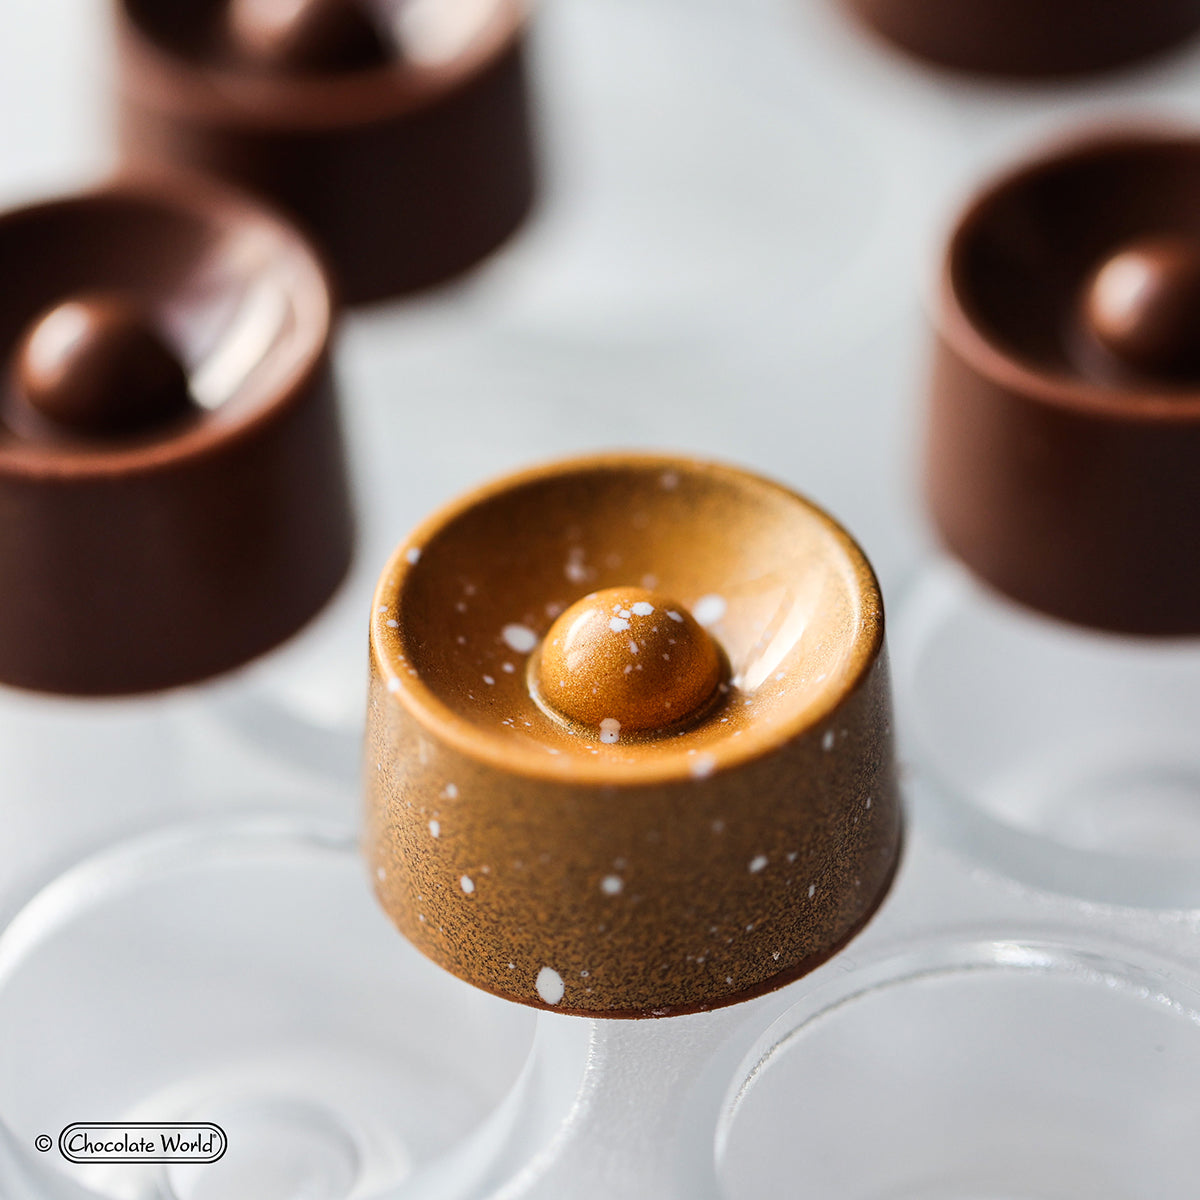
Adding Metallic Finishes
Metallized effects create luxury chocolates perfect for gifts and special occasions. Brilliant Gold Metallized Powder dusted onto set chocolates adds shimmer, while Brilliant Copper Metallized Powder provides warm glow. Apply with soft brushes or mix with neutral alcohol and spray using professional airbrush equipment for even coverage.
Pearly Chocolate Grains pressed into chocolate surfaces before full crystallization create textured metallic accents. These decorative elements elevate simple chocolate mold results into premium confections worthy of high-end chocolatiers.

Troubleshooting Common Problems
Even experienced chocolatiers encounter challenges when learning how to mold chocolate. Understanding solutions to common issues ensures consistent success.
|
Problem |
Cause |
Solution |
Prevention |
|
Sticking in molds |
Improper tempering, moisture |
Refrigerate 5-10 min, flex mold |
Polish molds, verify temper test |
|
Air bubbles |
Insufficient tapping, thick chocolate |
Tap vigorously 15-20 times |
Maintain working temperature |
|
White streaks (bloom) |
Temperature fluctuations |
Store at 60-65°F stable temp |
Proper tempering, avoid refrigeration |
|
Dull finish |
Poor temper, dirty molds |
Re-temper chocolate properly |
Clean and polish molds thoroughly |
|
Soft texture |
Chocolate too warm, wrong type |
Use couverture, temper correctly |
Monitor temperatures precisely |
Chocolate Sticking in Molds
Improperly tempered chocolate causes how to use a chocolate mold frustrations when pieces stick stubbornly. Verify chocolate passes temper test before pouring into molds. Ensure molds are completely dry and at room temperature; moisture or cold surfaces disrupt crystallization. If pieces stick despite proper preparation, refrigerate filled chocolate mold for 5-10 minutes to shock chocolate into contracting more dramatically from mold walls.
Polish polycarbonate molds thoroughly between uses to maintain release properties. Scratched or damaged mold surfaces create mechanical grip that prevents release regardless of proper tempering. Consider replacing worn molds affecting chocolate mold performance consistently.
Air Bubbles and Surface Imperfections
Trapped air creates holes and divots in how to mold chocolate surfaces. Tap molds vigorously on counter immediately after filling, working air toward cavity openings. Use Soft Scrapers to encourage air release from detailed areas before chocolate begins setting.
Chocolate that's too thick or cool traps air more readily. Maintain proper working temperature throughout molding process. Thin chocolate flows into mold details better, releasing air naturally during filling. For particularly detailed chocolate mold designs like the Chocolate Mold The Taster CW12027, consider vibrating molds on specialized equipment or using paintbrush to work chocolate into intricate areas.
Bloom and Discoloration Issues
White streaks or spots indicate bloom affecting how to use a chocolate mold results. Fat bloom occurs when chocolate experiences temperature fluctuations causing cocoa butter to separate and recrystallize on surfaces. Sugar bloom results from moisture contact dissolving sugar that recrystallizes as white spots.
Prevent bloom by maintaining stable temperatures during and after crystallization. Allow chocolate mold pieces to set completely at room temperature rather than refrigerating unnecessarily. Store finished chocolates in cool, dry environment at 60-65°F (15-18°C) with humidity below 50%. Properly tempered chocolate resists bloom significantly better than untempered alternatives.
Professional Production Tips
Scaling how to mold chocolate from hobby to professional production requires efficiency strategies and quality control measures that maintain consistency across large batches.
Batch Production Workflow
Organize workspace systematically for efficient chocolate mold production. Prepare all molds before tempering chocolate, ensuring clean, polished surfaces ready for immediate use. Temper larger quantities than needed to maintain working temperature longer, using Chocolate Melters that hold consistent heat.
Fill multiple how to use a chocolate mold cavities simultaneously rather than working one mold at a time. This assembly-line approach maximizes chocolate's working window before temperature drops below optimal range. The Formasil Silicone Mold 600x400mm series accommodates high-volume production with multiple cavities per mold.
Quality Control Standards
Establish inspection criteria for chocolate mold results ensuring consistent quality. Check each piece for proper gloss, complete release without surface damage, and absence of air bubbles or bloom. Reject pieces with visible defects for remelting and remolding rather than selling substandard products.
Document production variables including chocolate brand, tempering temperatures, ambient conditions, and any issues encountered. This record keeping identifies patterns affecting how to mold chocolate success rates, allowing process refinement over time. Temperature and humidity logs prove invaluable for troubleshooting recurring problems.
Investing in Professional Equipment
Quality equipment transforms how to use a chocolate mold efficiency and consistency. The Automatic Tempering Machine CW 12kg M1200 eliminates manual tempering variability, while Enrobing Lines speed coating processes for filled chocolates. Professional cooling equipment maintains optimal crystallization temperatures in warm environments.
Consider comprehensive educational resources from master chocolatiers to refine technique and expand design repertoire. Books like those available through professional suppliers provide formulas and troubleshooting guidance accelerating skill development.
Storage and Packaging
Proper storage preserves how to mold chocolate quality while professional packaging elevates presentation for gifts and retail sales.
Optimal Storage Conditions
Store finished chocolate mold pieces following professional standards that maximize shelf life and maintain quality:
|
Storage Factor |
Ideal Condition |
Why It Matters |
|
Temperature |
60-65°F (15-18°C) |
Prevents bloom and melting |
|
Humidity |
Below 50% |
Avoids moisture-related bloom |
|
Light Exposure |
Dark or minimal |
Prevents fat oxidation |
|
Container Type |
Airtight |
Protects from odors and humidity |
|
Shelf Life |
2-3 months (tempered) |
Maximum quality window |
Avoid refrigeration unless absolutely necessary; temperature fluctuations cause condensation leading to sugar bloom. Separate layers with parchment or wax paper preventing pieces from sticking together during storage. Properly tempered chocolates maintain quality for several months when stored correctly. Mark containers with production dates tracking inventory age for how to use a chocolate mold commercial operations.
Professional Display Solutions
Present molded chocolates using elegant display options that protect while showcasing artistry. Display systems offer various configurations from vertical stands to horizontal cases. The Chocolate Horizontal Display 80ET008 presents multiple pieces attractively while maintaining cleanliness.
Package individual chocolates in clear boxes or decorative wrappers that preserve quality while allowing visual appreciation of chocolate mold details. Coordinate packaging colors with seasonal themes or brand identity for cohesive presentation that elevates perceived value.
Exploring Creative Possibilities
Advanced how to mold chocolate techniques unlock creative opportunities from artistic sculptures to functional chocolate items that showcase skill mastery.
Combining Multiple Mold Pieces
Create complex three-dimensional chocolates by joining multiple chocolate mold components. Hollow shell halves bond together using warm chocolate or tempered chocolate piped along seam edges. The Chocolate Mould Egg Smooth 43mm CW1317 pairs perfectly with matching halves for complete eggs, while architectural designs combine multiple geometric shapes.
Fill hollow chocolates with ganache, caramel, or surprise elements before sealing. Position mold halves precisely using magnetic systems like Magnetic Chocolate Molds ensuring seamless joins without visible gaps in how to use a chocolate mold assemblies.
Seasonal and Themed Collections
Expand offerings with seasonal chocolate mold collections throughout the year. Easter egg molds and Easter Bunny designs capitalize on spring celebrations, while Christmas-themed molds and Snowman designs dominate winter production.
Valentine's Day showcases heart-shaped molds and romantic designs, while Halloween features specialty shapes. Building themed collections creates marketing opportunities and customer anticipation for how to mold chocolate seasonal releases.
Conclusion
Mastering how to mold chocolate and how to use a chocolate mold effectively combines technical precision with creative vision, transforming simple ingredients into impressive confections. Success requires understanding chocolate tempering fundamentals, selecting appropriate molds for intended designs, and executing systematic techniques that ensure consistent professional results. Whether crafting elegant gifts, building commercial chocolate business, or exploring confectionery artistry, the methods outlined provide comprehensive foundation for chocolate molding excellence. Discover extensive collections of professional molds, tempering equipment, and decorative supplies at Zucchero Canada to elevate your chocolate crafting to new heights.
References
Barry Callebaut. (2024). The chocolate tempering handbook. Chocolate Academy Centre. https://www.chocolate-academy.com
Greweling, P. (2023). Chocolates and confections: Formula, theory, and technique for the artisan confectioner (3rd ed.). John Wiley & Sons.
KREA Swiss. (2024). Food equipment and professional spray systems. https://kreaswiss.com/food-equipment
Pavoni Italia. (2024). Professional color collections for chocolate artistry. https://pavonitalia.com/en/collections/professional-collezioni-colori-e-materie-prime
National Confectioners Association. (2024). Chocolate manufacturing standards and quality guidelines. NCA Technical Manual.


Leave a comment
All comments are moderated before being published.
This site is protected by hCaptcha and the hCaptcha Privacy Policy and Terms of Service apply.